Showing posts with label mccalls. Show all posts

Monday, January 17, 2011

Bed, Bath, & a Dress

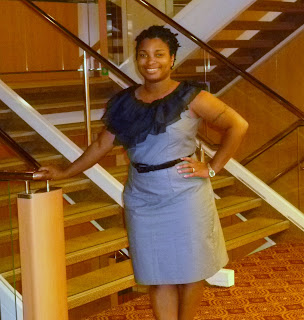
Ok so my sewing mojo is slowly creeping back and I am so proud of my latest project!!!  I have had McCall 5972 in my stash for a few months now contemplating what to do with it.  I knew I had to make view C but that was a far as I got.  I love the gray color trend right now so I decided to try something along those lines.  I searched and searched and couldn't find a gray fabric that I liked and then there was the issue of a fabric for the contrasting ruffles.  I knew gray on gray would be depressing, so what was I to do?  Well walking through the store recently I spotted gray sheets and an idea was born.  I had read reviews where sewers used sheeting as fabric for a dress so I knew it was totally doable.  A little more searching and I found a sheer black window panel on clearance and I was off!

Pattern Description: Fitted dress, with lined bodice, darts, neckline variations, waistline seam, back slit opening, side zipper closing and above mid-knee length.  I made view C with the contrasting neck ruffles.
 Pattern Sizing:  Available in 6-20.  Based on finished measurements I cut a 16 in the bust and graded to an 18 in the hips


Did it look like the photo/drawing on the pattern envelope once you were done sewing with it?  The drawing yes, the photo no, lol. 
Completed dress

Were the instructions easy to follow?  Very good and well written.

What did you particularly like or dislike about the pattern?  I love the end result but didn't like how the inside was finished.  I would have liked to not have to use bias tape on the armholes especially since the bodice was lined.
Back view

Fabric Used:  A gray sheeting fabric for the bodice and skirt and a sheer window panel for the contrasting ruffles.  The weight of the panel fabric was heavier than that of most sheer fabrics and brought a nice balance to the dress. I feel like it was also easy to work with as it was less slippery than the chiffon I have worked with in the past.
Back ruffles

Pattern Alterations or any design changes you made:  As previously stated I used contrasting colors for the dress.  I finished the ruffle edges with a rolled edge on my serger which was a real time saver.  Also because of the thin weight of the sheeting I doubled up on the fabric and lined the skirt.  I could have used a lining fabric but in retrospect I am so glad I didn't.  The two layers of sheeting was much easier to work with than the lining fabric I used on the bodice.  The skirt is essentially straight but for a woman with a few curves I didn't find it flattering.  I cut the skirt with room for the hips and to add more definition to the waist.  I accessorized with a skinny black belt to bring balance to the ruffles as well as break up the gray.
view without the belt

Would you sew it again? Would you recommend it to others?  I am thinking of making view B but that remains to be seen.  I do recommend this to others.  It makes a fabulous party dress.

Conclusion: I am thrilled with the end result and it was perfect for dinner out.  I had intended for this to be my anniversary dress.  Technically it still is/was although I didn't wear until a week later when we actually got to celebrate our anniversary.  Also this was also the first piece I made that included my labels!  Double the excitement!!


My Labels

Bottom Line:
Fabric:   Twin size Gray sheeting: $4.96
              Sheer Black Panel: $2.00
Notions: thread from my stash; I used my bias tape maker and leftover sheeting to finish the arm holes and stitch witchery for the hem

Total: $6.96


Monday, May 24, 2010

A wedding with McCalls 5570

One of my besties got married this weekend and I was honored to be a bridesmaid. One of my gifts to her was making the flower girl dress. But after spending countless hours on the dress, ask me how many pictures I took? I'll wait.........


ONE. And it was with my camera phone! So I've spent the morning stalking facebook pics of the wedding hoping to find a few decent ones.  I apologize now for the low picture quality.


Pattern Description: Children's/Girls' Lined Dresses and Sash. So very descriptive right? There are three different bodice variations (sleeveless, cap sleeve, or spaghetti straps) with the same full skirt. The dress is fully lined with tons of ruffles to make the full skirt and finished off nicely with a waist sash.

Pattern Sizing: Available in sizes 2-8. I cut somewhere between the 2-4 range.

Did it look like the photo/drawing on the pattern envelope once you were donesewing with it? Yes


Were the instructions easy to follow? Yes they were. After a while the construction started to follow a logical process so I ceased to refer to the written instructions and occassionally glanced at the drawings.

What did you particularly like or dislike about the pattern? The dress is adorable, what's not to like? But in all honesty I can't say that I was prepared for sewing through so many layers of fabric. I actually broke a couple of needles which is rare for me. That didn't really have anything to do with the pattern itself which appeared to be well drafted. I do wish they would print finished measurements on children's patterns as it was really tough for me to gauge. I will say that sewing the ruffles wasn't all that fun. Particularly when by the end of the reception they were non existent. Little Missy keep pulling her dress up to make it poofier but hey she's four and she still looked adorable even with her dress dragging the floor.

Fabric Used: For the lining I used an ivory china silk, for the dress itself an ivory slipper satin, for the sash a yellow slipper satin, and for the ruffles a green netting.

Pattern Alterations or any design changes you made: None as far as construction.  I did opt to add a purchased green bow to the back of the dress.  I used it to hold the sash in place instead of tying a bow.  It also really help draw all of the wedding colors together.


Would you sew it again? Would you recommend it to others? I would not sew it again but I would recommend it if you have the patience and time to make it.

Conclusion: Very cute dress that was appropriate for the occassion. Though it took quite a bit of time to make the end result was worth it.

Bottom Line:
1 yd of yellow slipper satin = 4.23

2.5 yds of ivory slipper satin = 10.58

6.5 yds of china silk = 13.70

8 yds of netting = 3.54

1 - 14” zipper =1.70

Total=33.75


Tuesday, March 16, 2010

What's Jaymee up to now?

My mojo is back and in full effect and Denver Fabrics recently had a 50% off sale. So that means I am no longer thinking about winter clothes but ready to crank out some pieces for spring. Here is what I will be up to for the next few weeks:

I've already cut out simplicity 2732 and 2401. The top is already in progress and I should have a review up in the next few days. I decided to be funky and wear the jumpsuit to the wedding instead of the dress so that will be next and while the black thread is still in the serger. The last three will fall in place but I'm thinking jacket, dress, then top.

Come on spring and stay!

Monday, February 22, 2010

A Great Tip

At some point I plan to make a friend of mine this top from McCall's 6034 pattern.


Well I honestly don't want to buy 4 spools of thread to use with my serger since I won't likely sew anything else in this color.

Thankfully a quick search on PR turned up this very useful tip:

https://sewing.patternreview.com/cgi-bin/review/readreview.pl?ID=1589

I'm calculating I've just saved about $7 in thread on this top alone. Woo hoo!

Wednesday, January 6, 2010

NewPatterns

Was I asleep when the new McCall patterns came out? I was browsing the website a few minutes ago and noticed some new patterns to select from.

The ONE that really caught my eye is 6024. I am totally in love with it already!

It's no secret that I am a sucker for a wrap dress but when you combine it with flutter sleeves AND a neck flounce, you could buy me for a nickel. I am now on the hunt for THE perfect fabric for this dress as I am planning to make it to wear the a rehearsal dinner.

There were a couple of others that I am still on the fence about but I am trying to stay focus on getting this stash down so that's it for now.

Tuesday, January 5, 2010

M5974 take 2

This is a second and less detailed review for McCall's 5974. You can see my original review here.

Pattern Description: Misses dress with bodice variations, front pleats, neckline variations, self-faced midriff, pleated skirt front, back zipper and sleeves in three lengths. I made view D which has a wrapped bodice, v-neck, self-ties and long sleeves.

Pattern Sizing: 8-16; 18W-24W. This time I cut a 14.


Did it look like the photo/drawing on the pattern envelope once you were done sewing with it? Yes

Were the instructions easy to follow?
I didn't actually use this instruction this time since I had just made another version a few weeks ago. But the instructions are very well written and make sewing this dress a breeze.

What did you particularly like or dislike about the pattern? You can see my original review for the whole list but basically I love the whole dress.

Fabric Used: A brown 'optic matte jersey' print from Joann's. I love the earthy tones of the fabric.

Pattern Alterations or any design changes you made: I shorted the skirt and added about an inch to the bodice so I could cross it over a bit more for modesty.


Would you sew it again? Would you recommend it to others? I still want this in a solid color but I have some other projects I want to knock out first. I do highly recommend this to others.

Bottom Line:

Fabric: 3 yds @ 6.49/yd = $19.47
Notions: thread from my stash
Total: $19.47


Monday, November 16, 2009

The "New" Perfect Knit Dress-McCall's 5974

Another knit dress to add to my wardrobe. I mean really, who doesn't like a good knit dress? Well this is a great one and I love it. This was one of the few McCall's patterns that caught my eye and after viewing Sharon M's review on PR, it quickly moved up in my sewing queue. I decided that this would be my birthday dress and I'm pleased to have finished it a whole month early!

Pattern Description: Misses dress with bodice variations, front pleats, neckline variations, self-faced midriff, pleated skirt front, back zipper and sleeves in three lengths. I made view D which has a wrapped bodice, v-neck, self-ties and long sleeves.

angled front view


Pattern Sizing: 8-16; 18W-24W. I cut a 16 but could have gotten away with a 14 because of the material.


front view with ties undone


Did it look like the photo/drawing on the pattern envelope once you were done sewing with it? Of course silly.

Midriff and bodice with ties tied


Were the instructions easy to follow? Yes. This is the 3rd P/P pattern I have used and love them all. Per their usual, they offer various fitting tips on the first couple of pages as well as throughout the instructions.

What did you particularly like or dislike about the pattern? Where to begin....well, like Sharon, I did not realize how far down the sides of the dress the ties actually go. They start under the arm and go down to the hips. This can be seen on the back of the pattern envelope, which I didn't pay any attention to until after the fact. Since I used a thin ITY knit this was not an issue for me, but is definitely something to consider if using a thicker knit fabric. I feel like the envelope should indicate that the zipper is optional. It says so in the instructions which you probably wouldn't see until after you have purchased notions. I am against knits with zippers anyway so I had already omitted that. I almost opted to leave the ties off since I did a lot of work on the midriff to make sure it was just right only to have it covered up by the ties. I do love all the fit options that P/P patterns offer and I really like how this one turned out.

Close up of bodice


Fabric Used: A creme and black ITY knit from denver fabrics. The weight was just right and worked particularly well when it came to do the neckline and hems. It also doesn't add bulk to the sides where the ties are attached.

View of where ties are attached


Pattern Alterations or any design changes you made:
I made a FBA and shorted the skirt. The FBA wasn't 100% necessary but since the bodice had pleating I didn't want to take any chances. For the neckline as well as the sleeve and skirt hems, I serged the edges, folded, pressed, then stitched down. For the ties, I serged the edges and pressed but didn't bother to stitch them down as I really didn't see the point. Also I only had 2.5 yards of fabric and not the 3 that is says is needed. Sometimes this isn't an issue but in this case it meant my ties aren't as long as they should be. They wrap all the way around but the knot looks silly so I just tuck the ends under and it works just as well.

Close up of midriff


Would you sew it again? Would you recommend it to others? I will sew this again in view A, most likely in a solid fabric. I do highly recommend this to others.

Other Notes: Definitely try the dress on during construction. It is very easy to make adjustments as you go if you follow their order of construction. I didn't have to take in the sides any but it would have been easy to do without a lot of work.

Close up of side


Omit the zipper. Trust me when I say it isn't necessary if your knit has any stretch.

Close up of center back seam


The midriff band helps give definition to the waist area which isn't always the case with knit dresses.

The bodice pleats do not add bulk which I was a little worried about.

The skirt pleats do not make this maternity like at all. I think that having the midriff band faced not only adds stability and definition but also helps make this dress very fashionable (and forgiving).

Close up of front pleats and midriff band


Conclusion: I really really really like how this dress turned out and is definitely the New Perfect Knit Dress-easily replacing 5752. I feel like it is more versatile than some of the others and while it is a faux wrap I still love it. I am now on the hunt for a solid fabric to make view A. Seriously if you don't have this pattern yet what are you waiting for?

Back view with ties


Bottom Line:
Fabric: 2.5yds @ 4.75/yd = $11.88
Pattern: $.99
Notions: thread from my stash
Total: $12.87


Friday, November 6, 2009

Finally......McCall's 5973

I know I have been talking about this dress forever and I finally finished it! I am so happy with the way that it turned out and I can't wait to wear it to dinner on Saturday!

Oh, and I finally found some pictures of the dress that was my inspiration:


If you ever watched the show "The Game" that used to air on the CW then you know this is the character Melanie Barnett. I fell in love with this dress, right down to the fabric choice, when I saw this episode but could never find anything at the store or a pattern that would be a good foundation to start with until I found this one.

Ok moving on, here is my review:

Pattern Description: A Create it! pattern from McCall's. I made the version that is a mid-knee length dress with self-faced front neck band band, elbow length sleeves, and back zipper.


Pattern Sizing:
6-22. I cut a 16

Did it look like the photo/drawing on the pattern envelope once you were done sewing with it? Mine is so much better!

Were the instructions easy to follow? Very easy. Everything is pretty straight forward so I have no complaints. The directions were broken into sections for bodice, sleeves, waist inset, and skirt so you can find the set that corresponded to your look and go from there.

What did you particularly like or dislike about the pattern? I really loved this pattern and have no dislikes.


Fabric Used: A floral print charmeuse from fabric dot com


Pattern Alterations or any design changes you made: None. For construction I machine stitched all seams and then serged the edges to prevent fraying. For the waist inset, I opted to stitch in the ditch rather than slip stitch the inside down.


Would you sew it again? Would you recommend it to others? I may possibly sew this again in a shorter sleeve version but I doubt it. There are a ton of other dresses I want to make but I do recommend this dress to others.


Conclusion: Fabulous pattern and I am very pleased with the end result. Can't wait until the Hubby sees it!

Bottom Line:
Fabric: 3 yds @ $2.49/yd=7.47
Pattern: $.99
Zipper: $1.79
Notions: facing from stash

Total: $10.25


Friday, August 21, 2009

McCall 5591 View A

Pattern Description: Mid-knee length, pleated skirts have faced yoke and back zipper closure

I made a modified version of view A. Originally view A calls for slash front pockets with band and contrasting lower band, however I omitted the contrasting lower band.

Pattern Sizing: 6-22. I cut a straight 14 but added length to the pattern piece since I was omitting the contrast.

Did it look like the photo/drawing on the pattern envelope once you were done sewing with it? Very much so.

Were the instructions easy to follow? I honestly did not look at the instructions when it came to sewing. I glanced at them but you can pretty much look at the drawings and see what to do. Pleats can be intimidating/time consuming but this weren't all that bad. I also like how there were separate instructions for each view instead of skipping around between views like I have seen lately.

What did you particularly like or dislike about the pattern? I did not have any dislikes with this pattern. It went together fairly quickly and without issues which is always great. I really like the pleats on this skirt and the overall effect they had for this very cute skirt. I also like the fact that I had no make no alterations to this skirt as far as fitting was considered. Another plus.


Fabric Used: A cotton sateen with just a hint of stretch from Fabric.com. It was called 'Cotton Sateen Jackie Peach'

Pattern Alterations or any design changes you made: As previously stated I omitted the contrasting band from view A. I could have just as easily made view B but I liked the pockets from A. In retrospect I probably eliminated one of the key design elements but at the same time I wanted to keep it simple. I felt this print was fine on it's own and adding a solid contrast made it too bottom heavy and not flattering on my figure/height. I used a a medium-weight interfacing for the yoke. I mention that because somehow the yoke-facing ended up being a good 1 1/2 inches shorter after I faced it which was really odd. Because of that I ended up doing a lapped zipper in the back. It still turned out very well. The only thing is that my pleats aren't symmetrical in the back but no one should be staring at my behind anyway so they shouldn't notice. I am patting myself on the back for being able to make a design change on the fly and not get frustrated.

I also top-stitched the yoke instead of under-stitching.
Would you sew it again? Would you recommend it to others? I may break this out again next spring when I need some instant gratification, but as for now it is being retired as a move on to my fall/winter wardrobe. I would recommend this to others because I found it to be a quick and simple project.

Conclusion: I am pleased with my result and would recommend this pattern. It definitely allows you to quickly add to your spring/summer wardrobe.

Bottom Line:
Fabric-Cotton Sateen Jackie Peach 1.5 yds at $2.49=3.74
Zipper-$1.49
Notions-stash
Total=$5.23


Sunday, July 19, 2009

McCalls 5662

Pattern Description: Tunics A, D, tops B, C, E and dress F have self-faced middle sections and bodice variations; tunic A, top B has self-lined close-fitting upper front and purchased rings; tops B, E have gathered, draped middle section; top C, dress F have looped overlay; top E has three-quarter length sleeves gathered into cuffs; dress F has three-quarter length kimono sleeves.

I made view D.


Pattern Sizing:
X-Small to X-Large. I cut a medium. It looks a little snug on Caroline here because I was attempting to stretch the fabric a little in the hip area before wearing it.

Did it look like the photo/drawing on the pattern envelope once you were done sewing with it? For the most part yes. I recycled some fabric from a dress I knew I would never wear again. I loved the color and thought it would make a fabulous top for summer. Dealing with material that has already been cut can be a challenge but I think I did alright. I could not find any thread to match so I decided to use a contrasting cream thread around the neckline. It will match the cami I plan to wear under this top.

Were the instructions easy to follow? Ha! This top is not a difficult top to sew at all but the instructions left much to be desired. I would much rather have them copy and paste directions under each view so you could follow continuously rather than skip back and forth. I really could do without having smiling cut out faces of those two women. All the jumping around could get very frustrating/annoying.

What did you particularly like or dislike about the pattern? This pattern was very easy to sew. Despite my issues it still came out well and I am happy with the result. I will say that I would not dare wear this top without a camisole underneath.

Fabric Used: Some recycled coral matte jersey

Pattern Alterations or any design changes you made: I had to play around with the pattern pieces to cut them out due to recycling the fabric. I somehow ended up with more room in the back piece than I did in the front. When I switched them around it looked so awkward that I turned it back around and put gathers in the center back. I also didn't add the facing piece to the midriff.

Would you sew it again? Would you recommend it to others? I would like to sew this again in a print fabric. Possibly in view E or F

Conclusion: Very easy top that could be worn anytime of the year depending on the view/fabric selection. It went together in only a couple of hours which was an added bonus. Would recommend.

Cost to make: Recycled fabric original price of $3/yd
Used roughly 1 1/2yds =$4.50


For the complete outfit I paired the top with a cream cami, jeans, and these shoes. Total cost of the outfit was under $30!